
How To Create Amazing Videos in PowerPoint

🎦 Check out our short video tutorial to see all the details in action 🎦
The Power of PowerPoint
Recently, we stumbled across a pretty amazing feature of PowerPoint - the ability to create awesome videos in next to no time! At DiscoverEI, being graphic designers we typically create most of our video content in the Adobe Creative Cloud suite - which is great if you have the skills and the licence… But when I was asked to share some tips and tricks for video making with a group of water professionals, I started the hunt for the best low-code, easy, and accessible video making tool. And to my surprise, PowerPoint was a clear winner!
In this post we share how to create your own videos in PowerPoint, complete with animations, screen recording and music!
Why would I want to make a video..?
If done right - videos can really help deliver your message in an interesting and engaging way, and in a fraction of the time compared to written reports. At DiscoverEI, we are always on the look out for any excuse to make a video, and even embed them in our Power BI reports (and yes - we’ve dedicated a whole blog post on how to do this!)

Create short instructional video tutorials to demo how to use different tools

Creating short project highlights videos is a fantastic way to engage the project team, stakeholders and the community!

Embedding videos into Power BI reports can help navigation and provide greater context. Find out how here!
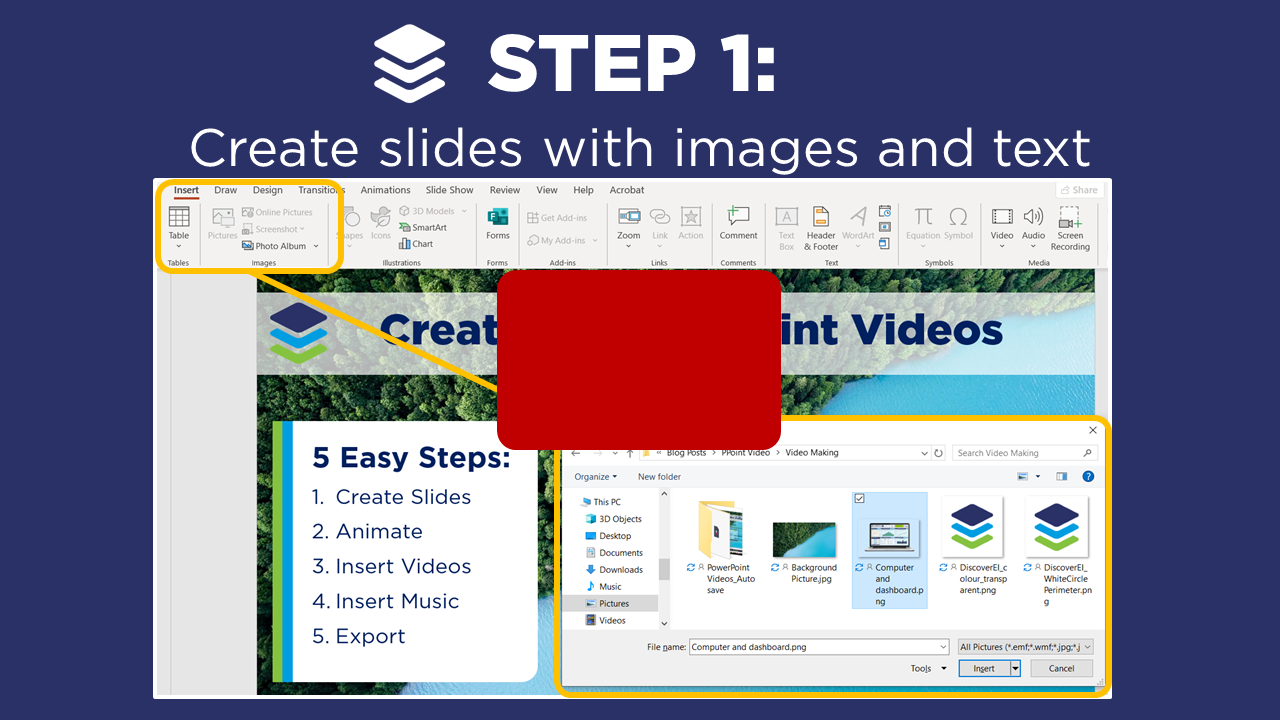
STEP 1: Create Slides
▶️ Skip ahead in the video to Step 1 ▶️
The first step is to create our PowerPoint slides. Just like you usually would when designing a PowerPoint slide show, it’s a great idea to structure your video with title, body and concluding slides!
In video design, less is often more. Creating a simple slide with a bold background and a single image or large quote is often more effective than trying to cram in loads of details. Below are three tips to help you get started designing your PowerPoint slides:
Add Images: Insert a background or anchor image to frame our slide.
Add Text: Add some text like a title, subtitle or key message.
Layer elements: Play around with transparency and shapes to layer your elements to create a sense of depth.
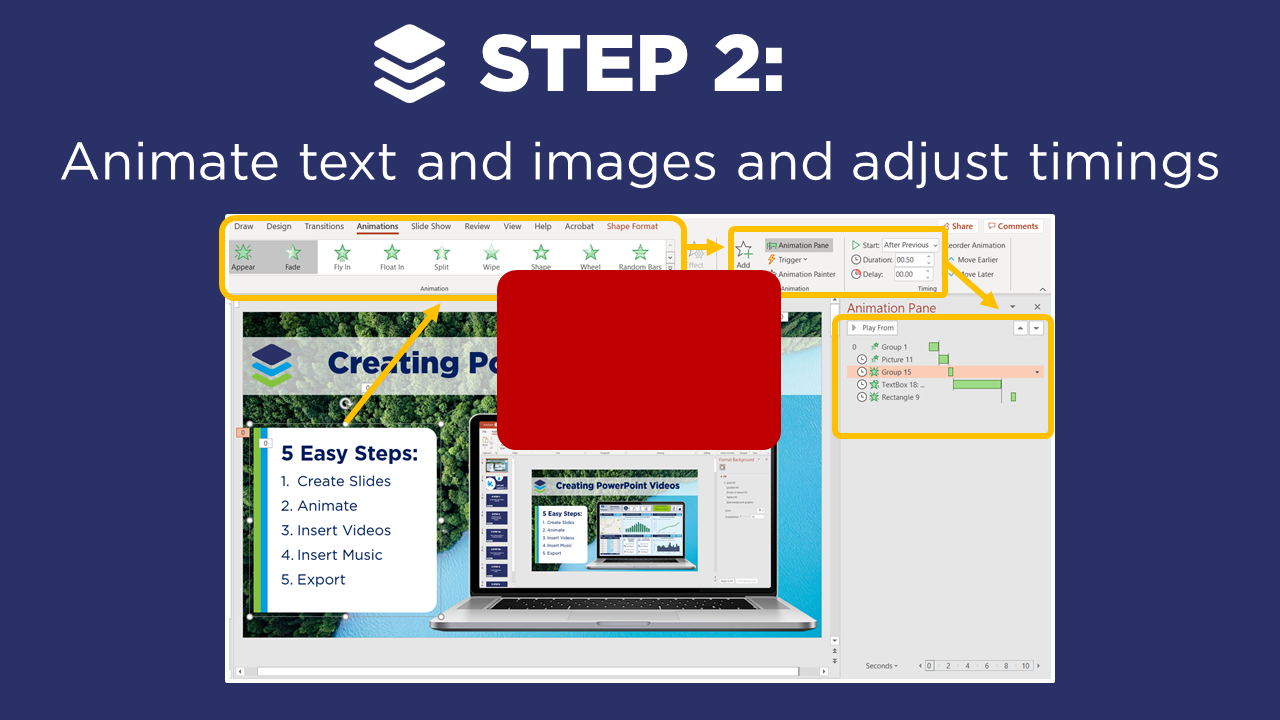
STEP 2: Add Animations
▶️ Skip ahead in the video to Step 2 ▶️
The next step is to animate the elements on our slides. This is where the magic starts to happen!
You’re probably aware of the ability to add animations into slides. Maybe you’re even guilty of abusing the “Swivel“ or the “Grow & Turn“ (I know I used to be!). However, if used wisely, animations can add great effects and create a real sense of flow to your videos.
Let’s Animate our elements:
Navigate to the Animation ribbon, and add entrance animation to the key elements on your slide. I love using the float in and zoom effects!
Open up the Animation Pane, and adjust the animation transitions. Set the first animation to be ‘Start with Previous’. This starts the animation as soon as the slide is visible. For all other elements, set the animation to ‘Start After Previous’.
Play around with the delay and the duration of your animations to create a better sense of flow in our video.
Review the animations either from presenter view or preview directly from the animation pane.
Get really creative with the animations - play around with the transitions, the use of colour, and layering of different elements!
STEP 3: Insert Video

▶️ Skip ahead in the video to Step 3▶️
Now I know what you’re thinking - isn’t this blog all about CREATING videos? But we can also insert videos that we have such as logo animations, or even capture a screen recording directly inside of PowerPoint.
We can either record our screen (which is great when we’re creating video tutorials) or insert a video from our computer.
Now you may be aware of a third option which is inserting videos from online sources. While this tends to be fine in normal slideshows, it’s not a great idea when creating videos due to the lag in loading time and all the other ad popups which come when viewing through YouTube or Vimeo!
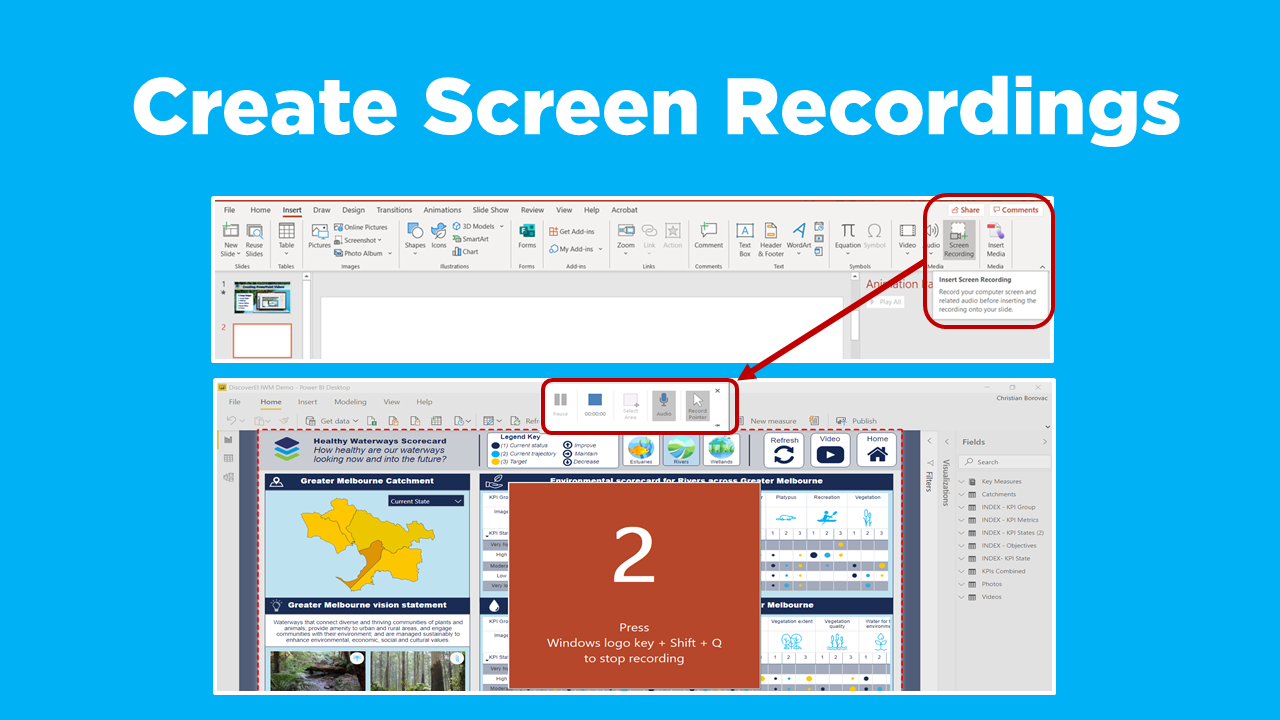
To create a video screen capture:
Screen Capture: We navigate to the Insert tab, then Media and the Screen Recording option.
Record: Select the screen area to record, audio and mouse settings, and then hit record!
Edit and Adjust Playback: Under Playback / Video Options, Change the Start option from ‘On Click’ to ‘Automatically’. This means the video will play when the slide is visible.

To insert an existing video:
Insert video: We navigate to the Insert tab, then Media then Video and the Video on my PC option.
Edit video: Under Playback you can trim the video, fade in and out, adjust the volume, and even insert captions!
Adjust Playback: Under Playback then Video Options, lets change the start option from ‘On Click’ to ‘Automatically’. This means the video will play when the slide is visible.
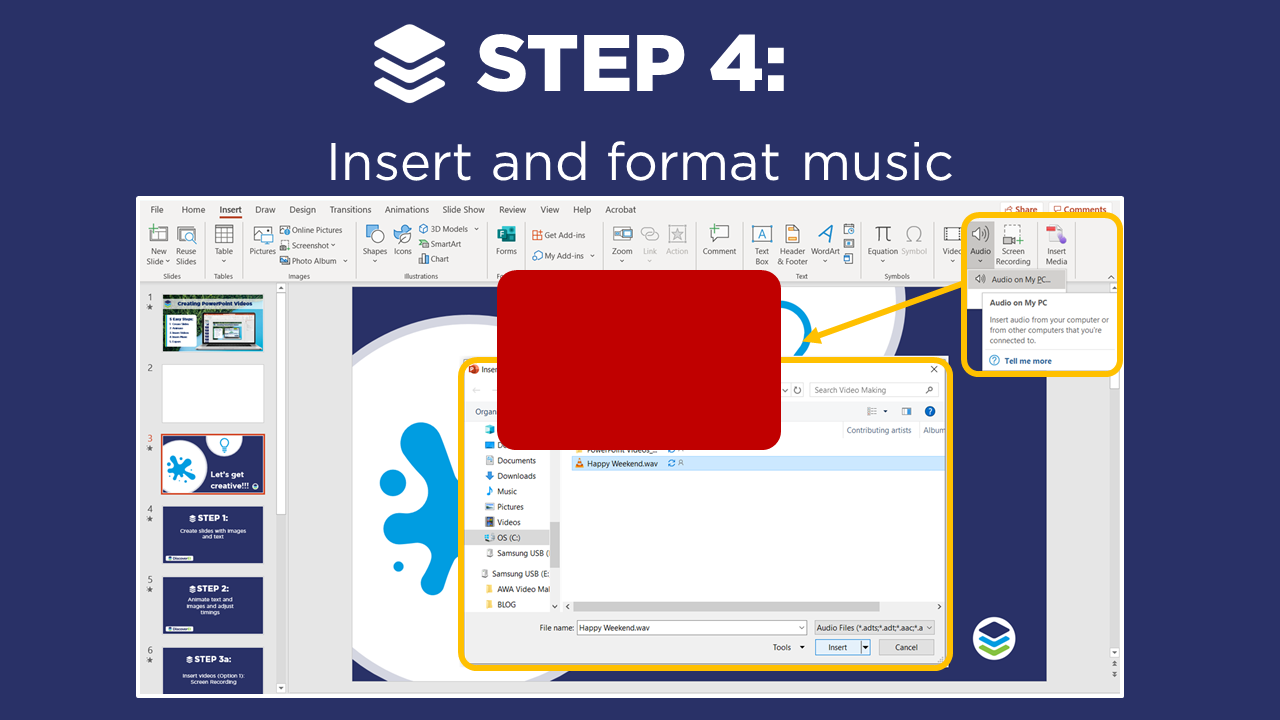
STEP 4: Insert Music
▶️ Skip ahead in the video to Step 4 ▶️
In our experience, if you don’t have a voice over (or even if you do!), music can really take your video to the next level.
There are lots of royalty free sites for finding music out there - or if you’re lucky (like us at DiscoverEI) you have a very talented DJ for a brother who creates you some custom backing music!
To insert audio:
Insert audio: Click Insert and select Media , then we want Audio and the Audio on my PC option.
Edit audio: Navigate to Playback, and just like we did for the video we can trim the audio, fade in and out and adjust the volume.
Adjust Playback: Under Playback then Audio Options, change the start option from ‘On Click’ to ‘Automatically’, and select ‘Play Across Slides’, to automatically apply across all slides.
TIP: Once you know the length of your video, it’s great to trim your audio and add a fade out of 3 to 5 seconds. This makes your video feel a lot more professional, and helps signal the ending to your viewers.
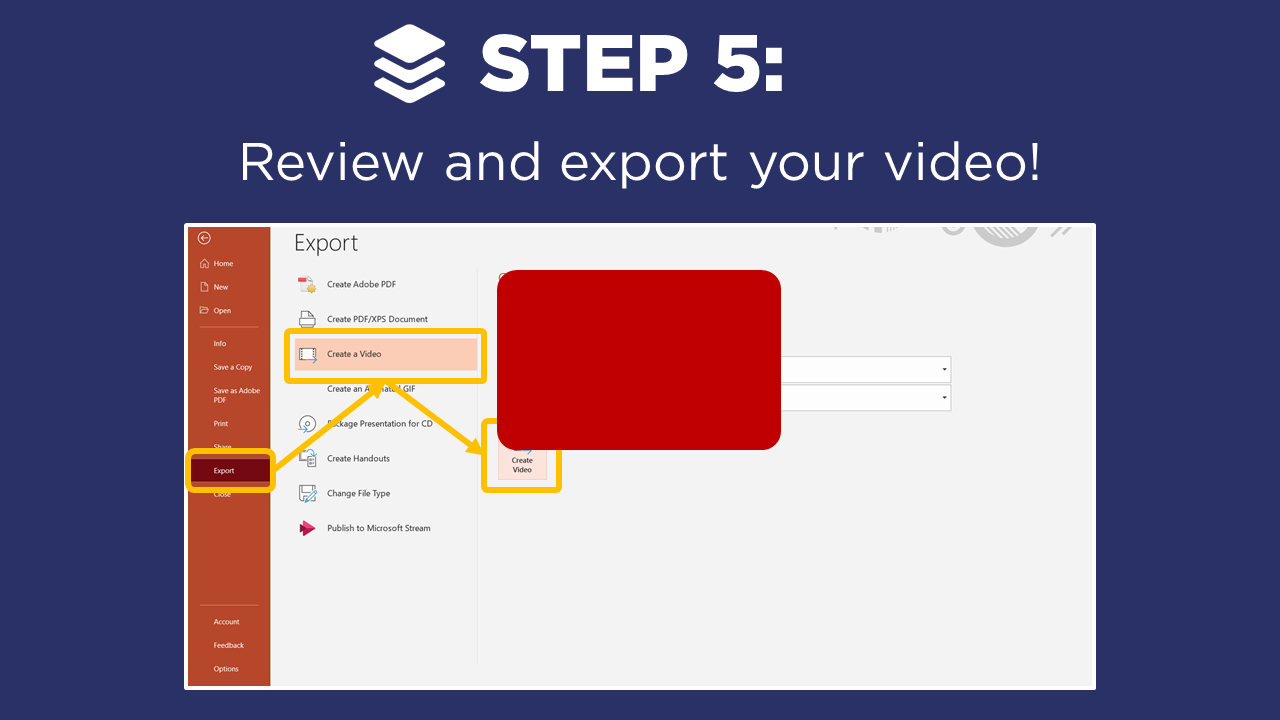
STEP 5: Review and Export
▶️ Skip ahead in the video to Step 5 ▶️
Now that you’ve created your PowerPoint slides filled with animations, videos and sound - it’s time to review and export your video!
To export your video:
Review: Navigate to the File tab, Export and Create Video menu. Here we can preview our timings, and adjust the default time on each slide.
TIP: You may need to adjust the seconds spend on each slide option to get a smooth transition (by default this is set to 5 seconds)
Export video: Select the video resolution, and press ‘Create Video’, and save as a .WMV. Note that we’ve experienced some slide transition glitches when saving as a .MP4.
Share: Share your video far and wide with your project team, on social media, or even embedded in your Power BI reports!
In Summary…
By applying our 5 simple steps we’ve created a pretty awesome video in PowerPoint which we can share with our project team, on social media, or even embed in our Power BI dashboards!
Check out this fun video we created in PowerPoint:

Do you have amazing video making skills and tips you would like to share? Or have any questions, comments or suggestions for future blog posts?
Please post in the comments below - we’d love to hear from you!
Power BI Training Courses
We’re really excited to announce the DiscoverEI teams virtual 2-day Power BI training courses, to fast-track your Power BI journey. Click on the links below to learn more, or get in touch today!
Purchase Training


Do you want to learn how to design engaging and intuitive Power BI reports, which communicate your key insights at a glance and tell your data story?
Our two-day Power BI training course is designed specifically for Power BI Professionals and Data Analysts, and provides our best practice tips, tricks and hacks to help you transform your data! We provide this course online, in-person group sessions, or customised in-house training for your team. Places are limited (max 8 participants per class) so secure your spot today!